Posted on 1 Comment

The “six pack” flight instruments: pitot-static

Flight instruments on a Cessna 172

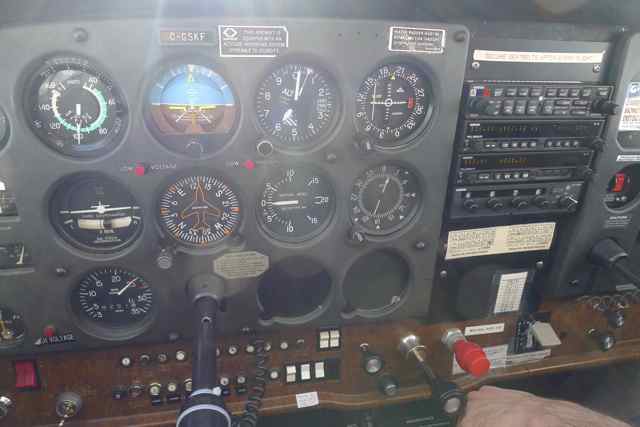
Let’s do a review of the six main flight instruments: 

Detail is provided, of course, there is so much more we can add here!  The most important and basic flight instruments have remained the same for a long period of time, and are called the ‘six pack’.  Three of them are connected to the static port system which measures outside barometric pressure and the pitot tube which measures ram pressure.   The other three are gyroscopic.

The Pitot Tube on a Cessna 172

The pitot tube, located on the leading edge of the wing, and the atmospheric pressure in the tube is increased by the dynamic pressure due to the forward motion of the aircraft while in flight.  The static pressure port is not affected by turbulence or ram air pressures.

The three instruments connected to the pitot-static system are:

(1) Airspeed Indicator (ASI) – pitot and static source; it measures the difference between the pressure in the pitot tube and the pressure in the static system. When the aircraft is on the ground the two pressures become equal, in motion the pressure difference causes the aneroid capsule inside the indicator to expand, moving the needle on the instrument.

The ASI shows indicated airspeed.  Indicated airspeed can be erroneous because of air density, which depends on pressure and temperature, and position error, which is caused by eddies that are formed when air passes over the wings and struts. This is the uncorrected reading from the dial and calibrated airspeed is the indicated airspeed corrected for position error (and installation error). Equivalent airspeed is the calibrated airspeed corrected for compressibility – this applies mainly to high speed airplanes.  Next we have true airspeed which is calibrated airspeed corrected for pressure and temperature. Roughly, to correct calibrated airspeed we add 2% to the indicated airspeed for every 1000 feet of pressure altitude.  We can gain more accurate readings using our flight computer – the E6B.

(2) Vertical Speed Indicator, static source. Operates on the principle that there is a change of barometric pressure with a change in altitude.  Atmospheric pressure is led into the capsule but slowed by a calibrated leak from entry into the case holding the capsule,  and this pressure differential causes the capsule to expand or compress.  There is a 6-9 second lag before it will indicate the correct rate of climb or descent.

(3) Altimeter, static source. Since pressure varies from place to place and the altimeter set to indicate height above sea level at the departure point may give a false reading after the aircraft has flown some distance.  To correct for this, the altimeter is equipped with a barometric scale (inches of mercury) which allows to set the current altimeter setting. We get this each time we depart our airport and can get it enroute.  If we fly to an airport that has a lower pressure than the one we departed from and we don’t change our altimeter setting, we will read higher than the actual height of the airplane. Temperature differences will also cause erroneous readings since the pressure altimeter is calibrated to indicate true altitude in standard atmospheric conditions.  When the temperature of the air beneath the airplane is colder than standard, the aircraft is lower than indicated, and vice versa for warmer than standard temperatures (higher than altimeter reading) .

Here are what we can expect from a compromised static-port system.

Instrument Pitot Tube Blocked Partially Blocked Static Port Fully Blocked Static Port
Altimeter Not connected Under-read in climb, over-read in descent Freezes
Vertical Speed Indicator Not connected Under-read in climb, less than true rate of descent Freezes at 0
Airspeed Indicator Acts like altimeter. Over-reads in climbs and under-reads in descents Under-read in climb, over-read in descent Under reads in climbs and over reads in descents.

Read about the other 3  instruments that are gyroscopes: the heading indicator, attitude indicator and turn and bank coordinator.

Do you have any other specialty instruments in your aircraft?

Posted on 1 Comment

Slow Flight – more detail on slow flight techniques

I talked with my instructor last night and he brought up a few very good points about slow flight.

In my post about slow flight in the Cessna 172 I wrote that there are five signs that we can identify we are in slow flight;

  1. Stall horn cutting in and out
  2. low airspeed
  3. high nose attitude
  4. high power settings
  5. sloppy aileron control

But we can extend these concepts to some of the other flight surfaces.  What happens to the rudder and elevator? We know that because of a nose high attitude we are pushing the boundary layer of laminar and turbulent airflow further up the wings – hence the wings receive less smooth, laminar airflow and are subject to buffeting from the turbulent air.  This renders the ailerons sluggish and slow.

But how does this effect the tail of the aircraft?

Torque and Asymmetric Thrust

Torque causes left turning tendency. Image Courtesy of flightlearnings.com

Recall that because of torque the aircraft wants to spin counterclockwise. This is because the propeller spins clockwise (when we are in the cockpit) and the airplane is a gyroscope – this tendency is explained by Newton’s third law.  Most aircraft are designed in a way to anticipate this, so in level flight, for example, many are designed to give more lift to the wing that is being forced downward. Torque means that the plane has a left turning tendency because more force is applied to left wing than the other. But this is only for level flight. When the aircraft is out of level flight, such as a take-off attitude or nose high attitude that we experience in slow flight, the aircraft will want to turn to the left. Hence, this is another effect on controls of slow flight.

Asymmetric thrust also means that the descending blade has a greater angle of attack than the ascending blade.  This gives more lift to the right side of the propeller (as seen from the pilots perspective) and a yaw to the left.  This happens during high power settings and in high angles of attack – just like in slow flight.  In level flight, both propeller blades meet the relative airflow equally (again, the thrust issue is anticipated in the design of the propeller) and they produce equal thrust, and no left yaw.

In addition, we also talked about why we need to learn slow flight. We are not actually in slow flight on approach and takeoff, but we are very close. We do not want to be in slow flight during these maneuvers, and want to be able to recognize when we are in too close. The airplane is no fun in slow flight – the ailerons are sluggish, the nose is high so our visibility is restricted, the engine is at high power settings and very loud. So the whole point of learning about slow flight is to avoid it.  It is not a comfortable flying experience.  Yesterday I learned how to do a slow flight with almost full power settings and full flaps. It was awkward flying it in this configuration.

So, another way we know we are in slow flight is due to (6) left yaw tendencies requiring use of right rudder to correct. This will be the sixth way we can identify we are in slow flight.

Posted on

The Soft Field Procedure

Before I learned precautionary and forced approaches, I learned about soft field landings.  Here my account of the experience, and why soft fields are important and should be practiced regularly.

When will we use a soft field landing?

If we are planning to land on an unprepared surface. We also need to know the technique if we need to make a precautionary or forced landing, and have to put our airplane down in a field.

Like the short field procedure, the soft field is a lot of fun.  It is used when taking off and/or landing on an unprepared surface. The can be a grass strip or turf runway, or a completely unprepared runway.  One of the main goals is to protect your propeller and engine in the sequence. This means we try to keep it from being struck by flying debris and damaged, and to keep dirt and debris from being sucked into the engine.   It also is to keep the nose gear from diving into a hole – since it is an unprepared surface there may be lots of surface irregularities.  A small dip and we could wheelbarrow the plane.  We keep the nose high throughout the procedure as long as we can.

It starts during the taxi

Can I land my airplane in that field?
Can I land my airplane in that field, and what is the technique?

In fact, when we taxi on the unprepared runway we keep our control column full aft.  So when we pull up to line up on our runway we are pulling back as far as we can on the control column.  When we add power, we push forward slightly on the column until the airplane is ready to fly.  We rotate at about 46 knots with 10 degrees of flap in the 172 N model.

We fly in ground effect until we have built up enough airspeed to climb.  This is about 60 knots, so when we reach 60 knots, we pull up and climb out.  At 200′ AGL we announce that we have “two positive rates”

(1) altimeter increasing (showing a gain in altitude), and

2) vertical speed indicator increasing, and we retract the flaps and climb out normally at 70 knots.

Hold off on the landing

The airplanes POH will show us what speed to approach for our soft field landing.  In the 172, we use 61 knots.  The idea on the flare is try to hold off landing even longer than usual to keep the airplane nose high.  So after we flare and we feel the first “sink”, we add a bit of power, around 100 RPM or so and try to keep the airplane from touching down. We do so until we have run out of altitude, and the airplane will touch down very softly.  We keep the nose high to protect the propeller and keep from nose gear from running into rough terrain.

Soft field touch and go’s are probably the most fun of all – we do not push the nose down, and take off right away in a nose high attitude.  That means we stay off the nose wheel and just do a “wheelie” down the runway, and take off! In my solo I managed to make this happen a few times.

Posted on 4 Comments

The Forced Approach and Landing

Forced Landing of TACA Airlines Flight 110. Image Courtesy of airliners.net

So now that we know about the precautionary procedure, what happens if we have NO engine power?

We plan a forced landing! The image above shows an actual forced landing of a Boeing 737 jet. TACA Airlines Flight 110 lost power in both engines and successfully glided and landed on an unprepared, makeshift field (image courtesy of airliners.net).

Is planning a forced landing possible?

For those who believe that a successful forced landing is difficult or impossible to achieve, Transport Canada’s “Flight Training Manual” (FTM) reminds us that for glider pilots every landing must be a successful forced landing. Hence, it is not only possible that it can be done, it can be done well.

Yesterday I went through the basics again with my instructor.  Each instructor has a different way of teaching, so the method will vary slightly for everyone.  The basics are more or less the same.

Famous Forced Landing: The ditching of US Airways Flight 1549 into the Hudson River. Image Source: wikipedia.org
Famous Forced Landing: The ditching of US Airways Flight 1549 into the Hudson River. Image Courtesy of wikipedia.org.

The most successful recent emergency forced landing was US Airways flight 1549: a ditching in the Hudson River. After multiple bird strikes into the engines caused dual engine flameout,  the gliding Airbus A320, which didn’t have enough altitude to return to the airport, was successfully ditched in the Hudson River. Like all pilots, trained in forced approaches, he captain used the same line of thinking that we are taught when learning how to execute a forced approach and landing.

We are flying along – and – we’ve lost engine power! What is the first thing we do? We fly the plane.

(1) Best Glide Speed

We have to establish our aircraft in “best glide speed.”  For the Cessna 172, this is 65 knots. The best glide speed provides the maximum “lift to drag” ratio and allows the airplane to glide as as long as possible.

(2) Best Field

Now we have to look outside and quickly locate the best field where we will put our aircraft.  We locate this field, and turn towards it.  Look for indicators of wind direction on the ground, and make your best efforts to land into the wind. If in doubt of wind direction, simply plan to land in the same direction that you took off from the airport.

Make sure to do a good check of the suitability of the area for landing. This means: check for civilization, obstacles, wind, field length, and landing surface – abbreviated the COWLS check.

(3) Fault

Now that we have our field chosen and have established our glide, we have some time to do some quick engine checks to try to determine the cause of engine failure. Often, with carburetor equipped aircraft such as the Cessna 172 the engine can die due to carb icing.  Or if we descend from a higher altitude and we fail to richen the mixture. These quit simple steps will attempt to reestablish engine power and will not cause us to loose too much time and altitude.

Fuel Selector Valve: Both

Mixture: Full Rich

Carb Heat: On

Ignition: Both

If it doesn’t start, we simply shutdown the engine using the same steps as above:

Fuel Selector Valve: Off

Mixture: Idle cut off

Carb Heat: Off

Ignition: Off.

The above three steps should take us about 500′ of elevation loss to do. Since this is a simulation … we do an engine warm up by adding 200 or so RPM.

(4) Mayday Call

Before we get too low we make the Mayday call. We say “Mayday” three times and our aircraft identifier three times (just like in the case of a precautionary landing).  Broadcast your location, your intentions of where you plan to put the aircraft, the nature of your emergency, and the number of people aboard.

(5) Passenger Brief

Let your passengers know: to put their seat back, stay clear of flight controls, put away all sharp objects, and so on.  You can let them know where the ELT and fire extinguisher are.  Also, it is important to ask them to unlatch the door prior to touchdown.

If this landing is on an unprepared surface, your landing will be a soft field landing.

Make sure to assess how the prevailing winds will affect your approach and landing. What are the upper winds doing?  Also state that you intend to touch down on the first third of the field.  For the Cessna 172, we touch down slightly tail low and turn off the electrical as instructed in the POH.

Successful Forced landings

Another example of a very successful forced approach is in the case of Taca Airlines Flight 110 on May 24, 1988. After flying through severe thunderstorms, the jet lost both engines that the pilots were not able to restart.  In the perfect moment the captain found a grass field and pointed the giant gliding 737 towards it. He was able to land successfully with no loss of life and minimal aircraft damage. In fact, Boeing engineers were able to do the necessary repair work on the spot and the aircraft was flown from the very spot where it was landed! Watch the video of the incident below.

http://www.dailymotion.com/video/x18y15x_mayday-air-crash-investigation-s11e11-nowhere-to-land_shortfilms

Read details of how to plan your approach and land in your desired touchdown spot. This is the low key / high key planning procedure.

Posted on

Precautionary Landings

Starting Point for Precautionary Landing. Image Courtesy of Langley Flying School.

Preparing for a precautionary landing

My next series of flights gets me out of the circuit and back into the practice area where I am learning how to do a precautionary landing.

Why do we need to learn this?

There are a number of reasons.  You may have a sick passenger on board, the weather may be a cause of concern.   There may be something that you are concerned with, such as an engine that is acting up, you may be getting low on fuel and think you may not make it much further. In any case, the landing is done to avoid a potentially worsening situation and is done so while engine power is available.  The sooner the landing area is selected the better once a precautionary landing has been decided.  Quite simply, a precautionary landing is completed in two basic steps:

1)  A low pass flown like a circuit over the potential landing area, this is done to inspect the surface for suitability, and

2) A normal circuit flown to end in a safe landing.

There are two basic procedures, one for a controlled airport and one for an uncontrolled airport. In the case where a field is selected, this is obviously uncontrolled.  This is what I have been practicing on.  When we arrive at the practice area, which is the Cremona area just north of Springbank,  we broadcast our intentions for the exercise then proceed to look for a field we can “land” on.

Starting Point for Precautionary Landing. Image Courtesy of Langley Flying School.

We find a field and enter a normal circuit approach. The goal is to make two passes: a high pass and a low pass to judge the suitability of the field for landing.

In an uncontrolled field, such as a farmer’s field, we make a high pass at 1000′ AGL and in a controlled field like an aerodrome we do this at 1500′.   Our high pass is done at cruise settings, 90 knots in the 172.  We fly the normal circuit at 1000′ and then overshoot.

Then we do the “3 Ps“:

(1) Pan Pan call: alert traffic in the area that we are preparing for a precautionary landing.  We say “Pan Pan” three times and say our aircraft identifier (for example, FIAH, GSKF, and so on) three times.

(2) Passenger brief. Let your passengers know what you will be doing, to stay calm, to put their hands free of the controls, and to move their seat back (if sitting in the front).  Then:

(3) We do our Pre-landing checks.

Then we do the low pass. This is done 500′ AGL or whatever altitude is best for inspecting the landing area. In the 172, we fly at 60 knots with 20 degree flap.   The slower speed will allow for better inspection of the field, and the flaps will allow for better forward visibility. The speed is also not too slow – that is it’s not in the slow flight range – which will allow the pilot to focus on observing the field rather than maneuvering the airplane. We also want to prevent getting close to a stall.

Precautionary Landing Procedure. Image Courtesy of mpaviation.com

On our observation of the field, we want to do our “COWLS” check, for suitability in landing:

C = Civilization: are there homes, buildings, or people nearby?

O = Obstacles: are there any obstacles that need to be cleared, such as powerlines, or trees?

W = Wind: always try to land into the wind if possible. Look for indicators on the ground: direction of smoke, direction of long grass, trees, etc.  Is smoke trailing upwards (calm winds), being blown slightly (gentle winds) or rapidly breaking off (strong winds)?

L = Length: once we are abeam the threshold, we count how many seconds it takes us to fly the length of the field. This is why we use 60 knots at 20 degree flap in the 172: if we count the seconds it takes to fly that length, we can estimate the approximate length of the field.

On the low pass, 500′ AGL, abeam the threshold, we start the timer. If it’s 20 seconds, the length is 2000′, (20 * 100); if it takes 33 seconds, the length is 3300′, (33 * 100)  and so on.

S = Surface: Check the suitability of the surface for landing. For example, are there ruts in the ground, or is the surface smooth? Is the surface grass or dirt?

Once our high and low passes are completed, we establish for a normal approach with full flaps.

Next read about the forced approach and see where it actually happened in real life!

Posted on

Slow Flight

Slow Flight. Image courtesy of gauravteneja.com.

Why do we need to learn slow flight?

Because we are really close slow flight whenever we are landing and taking off, and we need to know how the airplane “feels” to operate at such low speeds. We don’t want to be in slow flight during these phases, so we want to know how to avoid it.  Also, we pass through slow flight on our way to a stall, so we need to recognize when our airplane is losing enough airspeed and approaching a stall.

To enter slow flight for a Cessna 172:

1)  Complete the HALT check. Each school has it’s own acronym or procedure for this check, but they are basically the same:

H = Height. Must be recovered by 2000′ AGL

A = Area. Not over a built-up, or civilized area. No buildings, homes, people.

L = Landing Checklist

T = Turn Checks. We do a 30 degree angle of bank turn in each direction 90 degrees. This is how we check for traffic in the area.

2)  Reduce RPM to 1500 – Carb Heat Hot. Note the nose will drop.

3)  Maintain altitude and heading. Pull up to prevent the aircraft from descending.

4) Add power to hold altitude.

Confirm Slow Flight. The following are five signs that alert us that we are in slow flight:

1. Stall Horn cutting in and out;

2. Low Airspeed

3. High RPM

4.  High nose attitude

5. Sloppy aileron control.

We are in slow flight!