The other day I was out flying with my instructor reviewing soft field procedures. We were doing circuits on runway 25, and on the turn from the downwind to base leg of the circuit, we were hit with strong turbulence every time. The leg goes close to the river so we assumed it was something to do with that. It was a bit much for me and I lost my concentration, so I kept coming in too high and fast. After a few we landed and the controller immediately announced a runway change to runway 16. I decided that I still wanted to try it, given that the circuits we did on 25 weren’t really that great.
After takeoff from runway 16 the turbulence hit us again only a few hundred feet AGL. I decided that it was probably best to ask for a full stop and end the lesson. The turbulence was too distracting and kept me from being able to concentrate on the maneuver. Inadvertently on the landing again, I came in too high. So my instructor told me to use a forward slip – which is something that I’ve done numerous times – but I hesitated and my mind went blank. I eventually did it, but think this is a procedure I need to practice still, particularly when I go solo.
What is a forward slip?
It is a turn that is prevented by use of rudder. The airplane moves in straight, drag inducing position that increases rate of descent and doesn’t increase airspeed – because of all the drag that is created by the airplane in that configuration. The aileron holds the bank while the opposite rudder causes the nose to point in the other direction.
To enter a forward slip, power to idle, turn the aircraft into the wind, and use opposite full rudder. The configuration feels somewhat awkward to me since the airplane is steeply banked and pointing in the other direction. Like everything in flying, it is all about practice until it feels natural!
Another thing is I REALLY need to start bringing my camera and maybe my video camera to my flights! I am always too lazy to take photos but it is great to have them particularly so I can share them here.
Since the weather has been so bad for the month of October in the Calgary area, we have been seeing a lot of IFR weather – weather that I, as a private pilot can’t go flying in. What defines IFR conditions? I thought it would be useful to post the IFR outlook chart as published by The Aeronautical Information Manual (AIM).
This table shows the airport weather minimums required for operation – takeoff and landing.
There is also SVFR – special VFR that the VFR pilot can request when minimums are not met. SVFR requires that the pilot has at least 1 mile visibility, stays clear of cloud and the aerodrome has 1 mile horizontal visibility.
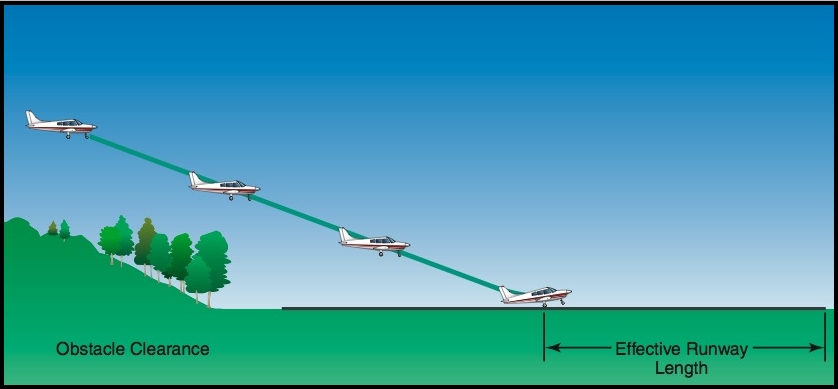
The next maneuver, after mastering the short field procedure, is doing so imagining having to clear a 50 foot obstacle on both take off and landing. This is accomplished by imagining that there is a 50 foot obstacle at the end of our runway on the takeoff, and that there is a 50 foot obstacle on the start of our runway on the landing.
This short field takeoff and landing with obstacle procedure builds on the skills practiced in the short field takeoff and landing with no obstacle. The objective is to use as little runway as possible to land and take off, but also to accurately plan our clearance point. On the takeoff we need to become airborne as soon as safely possible and climb as fast as possible so we clear our obstacle. This means we need to use Vx, our best angle of climb speed.
On the landing, we have to plan it so we approach so we clear the obstacle and at a proper speed so we still have enough runway to stop. The obstacle approach will have us touching down further down the runway then we would if we didn’t have an obstacle to clear, so we have less usable runway. We want to be at a slow enough speed commensurate with safety so we can stop with enough runway.
Ask for clearance
Since I fly out of Springbank airport, which is a controlled airport, I ask for a short delay on departure when I’m holding short of the runway. In this procedure we line up at the very end of the runway – “on the button.” Like the short field, we apply full brakes add full power, carb heat cold, check the engine and mixture (if required) and release the brakes.
The speed at which we rotate – or take off – will be given in the aircraft’s POH. The POH will also give us the climb out speed. For the aircraft I learned on, GSKF, a Cessna 172 N, this is 46 knots. Note that the speed will change with respect to the aircraft’s weight – this is all given in the POH. The POH will also tell you if you need flaps or not for the procedure. For our aircraft I used 10 degrees of flaps.
Steeper climb-out angle
The main difference is we climb out at a much steeper angle than we did when we didn’t have an obstacle. This causes the stall horn to sound – which I found disconcerting – but remember, the stall horn sounds 5-10 knots before the stall, so you will have time to ensure you control your speed, and on take-off, our speed is increasing, not decreasing. Be aware, even though it takes a big longer to stall the aircraft at such high power settings, if you do, this is the dreaded departure stall.
Note clearing the obstacle
We need to mentally ‘note’ where the obstacle is, and to say “clear the obstacle’ once we have cleared it. At Springbank, the altitude is 3940 feet, so once we are approximately at 4000 feet we announce we are clear the obstacle. The same follows, at 200 feet AGL we announce two positive rates and retract our flaps if we are using them.
More controlled, power-on approach required
The approach for landing is similar to the short field, with flaps – however the objective is to use a power on approach so once we reduce power to idle once we are are clear the obstacle. We try not to approach too high initially so we decrease power to idle too soon – I made this mistake a few times while practicing, and on the flight test, the examiner wants to see that you know to decrease power once you are clear the obstacle, so they see you understand this is what you are trying to accomplish.
Once clear the obstacle which we imagine is at the start of the runway, we announce it, reduce power, and loose the last bit of altitude, flare and touch down. When we touch down, we push the nose down, retract the flaps, and add heavy brake while applying full back pressure with the control column.
Learning this procedure is challenging, but it is A LOT of fun!
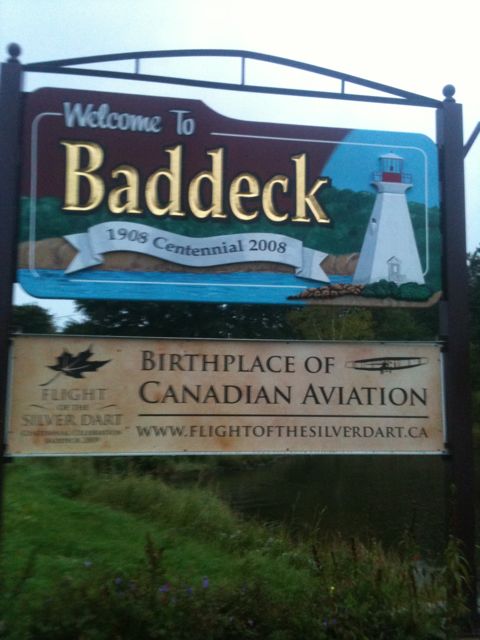
While on a two and a half week trip in Nova Scotia and Newfoundland I ran into a bit of Canadian aviation history. Quite coincidentally, on my way back down through Nova Scotia towards Halifax, I stopped in a small town on this lake for the night. It looked interesting. It turns out that this town, Baddeck, Nova Scotia is the birthplace of Canadian aviation. It was here that in 1909 Douglas McCurdy flew the Silver Dart airplane designed by himself, Alexander Bell, Fredrick Baldwin, Thomas Selfridge and Glenn Curtiss. Quite a coincidence to stumble upon such a historic place completely by accident.
The Silver Dart (shown on the left) flew about 6 meters from the ground almost a kilometer at 65 km/h. It took off on the ice from Lake Bras d’Or. It was the first powered, fixed wing aircraft to fly in Canada.
The inn we stayed in that night was build in 1830 and also has significance in aviation history. It was the home own by McCurdy – the man who flew the Silver Dart for the first time – and therefore is Canada’s first pilot. I’m not a big history buff, but I found this an interesting coincidence and appreciated knowing more about the roots of aviation.
Just have to make sure you know what you’re doing …
In the previous post I talked about my frustration with adjusting to my new instructor. About a week later, I went up with a level 1 instructor at our school. Throughout the flight, he didn’t say much to me and let me do all the work. On one landing there was a small bit of cross wind and though it stressed me out, he didn’t worry and let me handle it. It was confidence inspiring. I definitely felt that I can handle it now, and most of my fear was gone.
I was expecting him to send me up solo on that flight, but he didn’t. I never knew why, because he thought I was ready, safe and thought my landings were soft. Another one month break followed because of weather cancellations – and a one week climbing trip I had planned. When I got back, I was as mentally ready as it gets.
You can’t be more ready
I was still really scared, but tried not to think about it during the day. The weather looked great, winds calm, sky clear, sun shining. The forecast was splitter. So we went up together that afternoon and I did 3 good full-flap landings and he was pretty happy. After our third downwind he took the radio and I knew what was coming – he had asked for a full stop. After that landing, he pulled the power, applied the brakes and taxied to the apron. I protested, again! I was surprised how much I didn’t want to do it when the time came. It is such a huge mental barrier.
Obviously, he wasn’t going to have any of my whining, so I pouted, and before I knew it, he was gone. I will never forget his big smile when he left me. If he was worried, he didn’t show it, and I was probably worried enough for everyone involved.
So I thought to myself: “whatever, get it over with” and tried not to think of the significance of what was about to transpire. I also intellectualized that this is nothing more than the logical series of steps that sums up all the lessons I’ve learned up until that point, and is not the sum of all of flight training. I still had a way to go. But a solo circuit I could definitely handle.
So I taxied, did my checklist and before I knew it I was lined up on runway 16, cleared for takeoff. I took a breath and relaxed – and did what I had been practicing for hours and hours. Apply full power, confirm, check engine gauges in the green, apply right rudder to maintain center line, and note the increasing airspeed. When it reached 55 knots I pulled up, and became airborne smoothly, all by myself for the first time.
So this is what it feels like …
I did a lot of reading on what the first solo was supposed to be like, and thought I would panic when I realized I was alone. That moment didn’t happen for me at all, but what I did notice is how fast I was airborne and how quiet it was all alone in the cockpit! All there was the sound of the radio chatter and the whir of the propeller. I did my landing checks, called the tower, and before I knew it I was descending, adding flaps and slowing down for my 60 knot approach. I crossed the runway threshold and pulled the power, flared, and touched down with the right wheel first (because I didn’t use enough right rudder). The wheel skipped and I straightened the plane out, and began slowing down.
I had done it!
I exited off the nearest taxiway I could and received congratulations from the controller over the radio. The feeling I had was hard to describe. Months of tension and anxiety, stomach aches and dread all remedied in the 6 minutes it takes to fly the circuit one time. I have to say that the worry and anticipation for the first solo are much more difficult than actually doing it. I was surprised that the landing had felt exactly the same as when I was flying with Nas or Sarah.
The Canadian ‘first solo’ initiation
Here comes the water! The guy who is dumping it has done this before … he is quite good.
I taxied back to the school feeling light as a cloud – and completely forgot the initiation ceremony that was about to happen. When I got to the school I saw my instructor waiting for me outside. I pulled up and he came to the side of the plane as I shut down the aircraft.
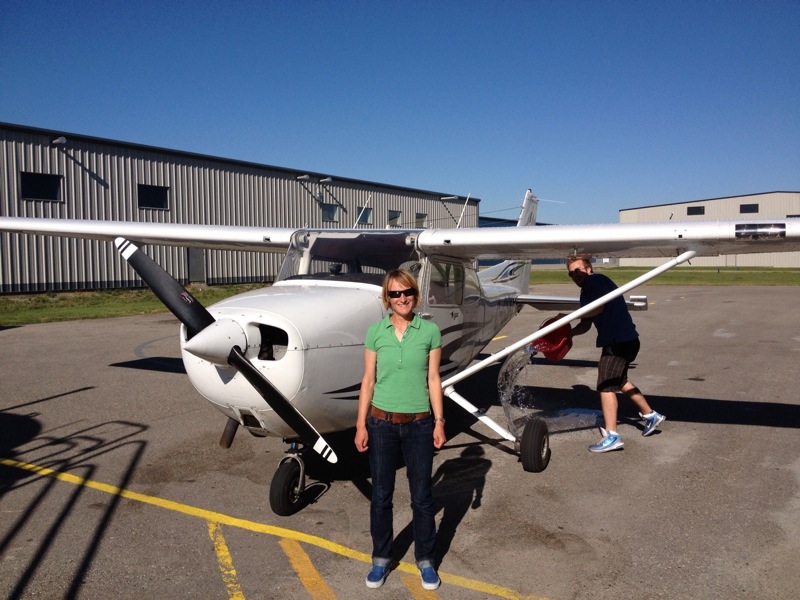
When he saw me gathering my things, he told me, not to worry about them and just come out for a photo first. So I did, smiling big, gave him a hug and posed in front of the plane while a few people gathered to watch. As they backed up I posed in front of my plane, GSKF, and immediately heard someone running behind me. In a split second I knew what was coming – and the next split second I was soaking wet!
They dumped an entire bucket of water on me – the Canadian initiation ceremony for the first solo flight. It was totally hilarious. We took a bunch of photos, chatted for a bit and completed all the usual post-flight paper work, and I drove home. I felt more elated than I have felt in a long time.
My life certainly isn’t boring, but there is no real way to describe how amazing it feels to fly an aircraft all by yourself.
Me and my awesome instructor Nas
A huge reduction in anxiety … surge in confidence
I had a great night. I couldn’t stop smiling, and though I was exhausted I lay in bed thinking about what happened that day. I felt like I could levitate … It’s like being in love. The next morning I had a flight scheduled, and I couldn’t wait.
Most of my lessons are preceded by feelings of anxiety a few hours before and I often get stomach aches. Well, this was the first time ever that I didn’t feel anxious or nauseous. I drove to the airport the next morning feeling confident and happy, and not tense and worried as usual. My instructor jumped in with me and we did 3 circuits, and on the third he pulled the power and it was the same story, except this time I did 4 circuits, all on my own. It’s like magic… and my wildest dreams coming true.
So how did Sarah know I was ready to solo anyway? She said that there is a point where the student knows the circuit really well and can get the plane on the ground safely, mainly knowing when to flare for landing and continuing to pull up until the main wheels touch the ground first, and not all wheels at once. I had done those well. She said there is also a time when you can sense the student is ‘bored’ and not really progressing anymore, and that is the right time. Going solo reinforces all the skills that you have learned up to that time, and in fact is the time when “learning really begins.”
So then came the complicated series of steps to get to know my new instructor, his teaching style, and what he was looking for. I also had to show him what I was proficient at and where I needed help, so it takes some time where we are trying to find out how we can work together so I can best learn. I was expecting that we would fly together one day very soon and he would send me solo, like Sarah did, since I was already there. But I found out it wasn’t as simple.
Different Classes of Instructor
Sarah is a level 2 instructor. Instructors start out at level 4 and through a series of accumulated teaching hours and issuing licenses to students as well as writing of exams can attain level 3, then 2, and then 1, which is the most advanced level. Level 4 instructors are under the supervision of a level 2 or 1 instructor at all times until they meet criteria to advance levels. My new instructor is level 4 and did not have permission to send me solo, but had to get a more advanced instructor to check my flying before he could sign off on me.
Review and more review … frustration
So we ran through a series of exercises again. Though I’d already done most of them with Sarah, we needed to do them again together. So we did lots of cross wind landings, perfected a much softer landing technique, and we also did a series of emergency engine out procedures. We also did something I never did with Sarah. It’s called a power-off 180. Basically, we simulate an engine out on the downwind leg and establish a best glide to make it to the runway. It was a lot of fun, but then I began to be impatient and tired with the circuit.
Cessna 172 cockpit. Note the pink headset … that would be mine!
Though I was scared to solo, I had intellectualized it that I needed to go or else I may as well quit training right now. This was a frustrating time for me. I was very tired of the circuit, I felt like my training wasn’t going anywhere, I was trying to adjust to my new instructor and I missed my old one. I was starting to lose my love of the flying that I worked really hard at. I felt frustrated and lost. Turns out, this is actually quite normal: instructors can recognize it.
Out of the circuit to explore
I think sensing my boredom, my instructor suggested we fly to Olds/Didsbury to practice circuits there. It was a day that I will remember, it was 8 am, clear and sunny, and there was some navigation involved so it was a new experience for me. This went well and the next lesson we had ideal conditions and I demonstrated a series of really nice landings. I felt pretty comfortable with them at this point, and finally had ‘clicked’ with my new instructor.
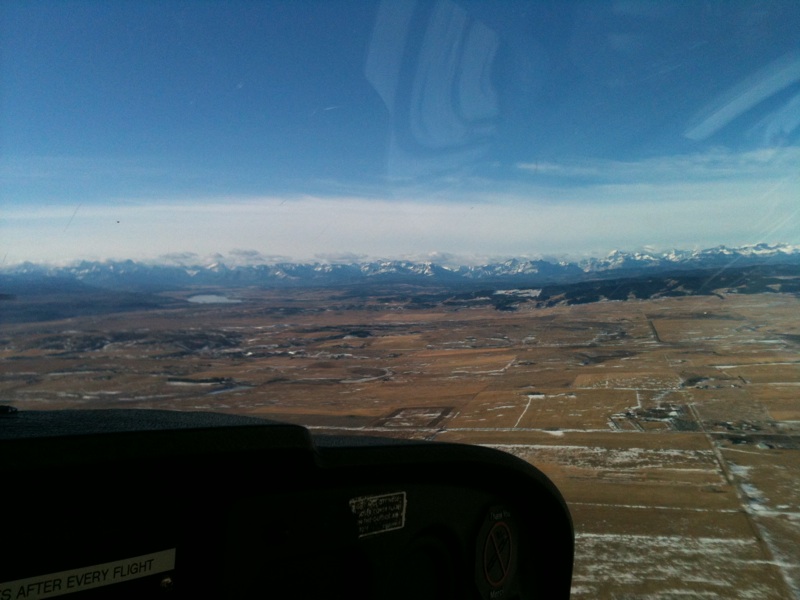
Flying out CYBW, Springbank airport which is number 6 for aircraft movements in Canada. We live near the rocky mountains of Alberta and are obsessed with mountains and aviation!
>>Read More >> Contact me