One of the hardest thing in flying is learning to land. When I was struggling with the landing, my instructor made me feel better by letting me know this, and saying that she didn’t really “learn” how to land until she was doing her commercial license. Of course she knew how to to it, but by that she meant that she didn’t really feel fully comfortable until then.
This put a few things into perspective, how long it will take until not only will it feel natural but you will not be so terrified and dry-mouthed every time you do it. Since my first solo flight, I have really started paying attention how to possibly make the best landing happen consistently. I haven’t been flying in the circuit much lately, so each flight I only get to do one of these landings so I try to make it as good as possible.

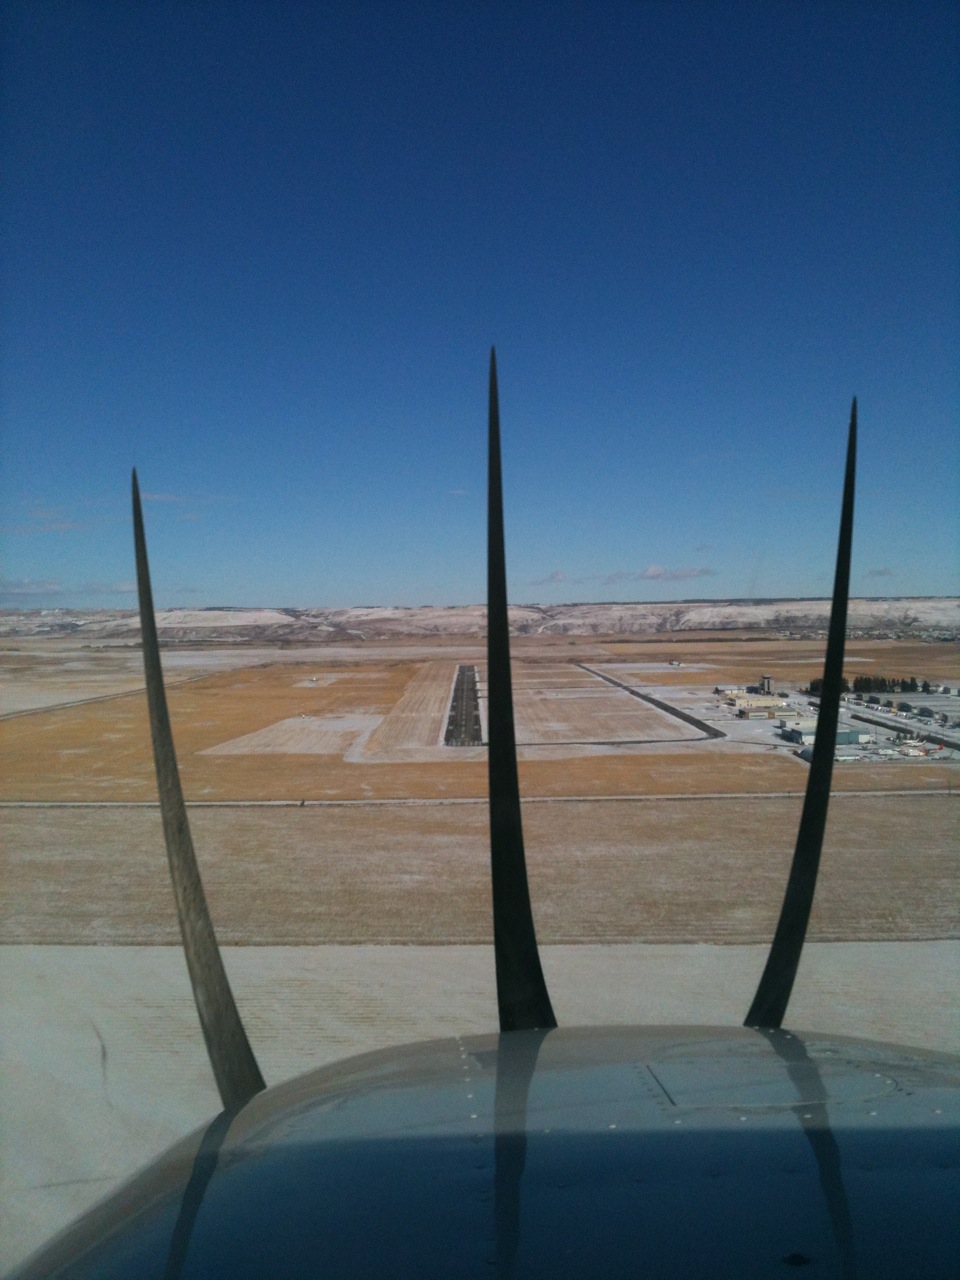
The landing sequence. This plane is about to flare.
Four things will cause left -turning tendency. These are:
1. Torque reaction from engine and propeller
2. Slipstream causing a corkscrewing effect of air hitting the tail on the right, yawing the aircraft to the left.
3. Gyroscopic action of the propeller, the propeller is a gyroscope and tries to “spin” the aircraft the opposite way.
4. Asymmetrical loading of the propeller at high nose attitudes.
On landing, asymmetric thrust causes the left yaw. When you touch the ground, be prepared to add even more right rudder. The engine torque will cause the left wheel to carry slightly more weight than the right, increasing it’s drag and causing even more yaw to the left.
So how can you strive to make each landing perfect? I’ve made a list of steps that I think are very important to note:
1. Check winds. When flying in the downwind leg, when on final, or whenever you get a chance note the windsock so you know what winds you will be experiencing on the ground and on your final approach. Will you have a crosswind?
2. Approach at a constant airspeed for your configuration (whether using flaps or not), do not “chase” the airspeed: that is, do not focus your attention on the airspeed indicator and try to correct deviations by switching attitudes. Establish your airspeed well in advance on final, note how the horizon looks when you have reached the proper airspeed, and keep it there. Once you have your airplane in the right attitude, keep it there.
3. Pick a spot on the runway. When you stare at this spot, this is where you will flare. It also allows you to break down your desired touchdown spot and keep you from focusing on the entire runway.
4. Flare 5-9 meters (15 to 30 feet) from the ground. Over time, you will “sense” where this point is. I learned that to recognize this point is to when the movement of the ground suddenly becomes very apparent, the whole landing area seems to expand, and the point where the ground seems to be coming up so rapidly that something must be done about it.
5. Once you flare, wait for the sink. You are trying to bleed off airspeed. Once you feel the sink, pull back more, just don’t pull back more before you feel the sink. This will cause the aircraft to balloon – gain lift – and the high nose attitude can cause you to stall when still too high above the ground resulting in a hard landing. You need to cover up the runway with the nose of the aircraft to get the proper high nose landing attitude. It will feel uncomfortable at first – it did for me. This will allow you to avoid touching down with your nose gear, or having a ‘flat’ (three wheel) landing, which increases the risk of wheelbarrow. Pull back slightly each time you feel a sink, this will allow you to check your rate of descent until all flying speed is lost and you can touch the runway as lightly as possible.
6. Get in the habit of keeping your hand on the throttle throughout the landing. If something happens, for example if the landing is not going well and you need to overshoot or if there is something else wrong and you require application of power, the time to get this power if your hand was not on the throttle is too long.
There are four different kinds of landings:
- Normal landing
- Cross-wind landing; where wind inputs will be needed
- Short field landing, and
- Soft field landing.
We learn each landing and we practice all of them until they present no difficulty.

I noticed that all my flight instructors doing my bi-annuals over the years have different techniques in the pattern. One had me set desired flaps abeam the numbers when powering down (Archer) and the other would apply one notch, then two notches, than three ect at everyturn in the landing pattern. I found the latter the hardest to maintain a good descent rate. Applying flaps needed abeam the numbers I can set up the plane and ‘usually” have a more precise and smooth landing. Any thoughts?
Yes, my instructor teaches me to start adding flaps while on the base leg, and have full flaps added and fully configured about 1-2 miles before the threshold. When I add them too early I feel I am “dragging” the plane in, lots of drag with 30-40 degree flaps and an airspeed 60 knots. The latter does sound a bit complicated as you would constantly have to reconfigure. I will ask my instructor about it!
Hi Roy. Flaps add both drag and lift. From an engineering point of view, two challenges are present. The aircraft needs to be as drag-free during high speed cruise while its wing produces sufficient lift for safe and responsive low airspeed flight, such as during approach and landing. In a light aircraft, the speed difference between approach and cruise is not of big concern. Throw in an airliner however, which is capable of flying both rather slow on approach (120-150kt average) and very fast, often almost supersomic in cruise and the game changes. In such cases the designers employ leading and trailing edge flaps, retractable undercarriages and other innovative means. The extra drag is rather undesirable as it won’t allow the aircraft to fly efficiently.
In other words, just as you wouldn’t want to approach fast and without flaps, it would be silly to fly in cruise with flaps extended. When exactly should this transition from cruise to approach occur? Flying in the circuit is a great way to learn how to takeoff and land, not the least because it allows for a shot at the approach every six minutes or so. One fact often forgotten in the lesson however is that the circuits main purpose is not that of pilot training, but rather as a means for aircraft to arrive and sequence safely and is used as part of the standard joining procedure at many airports.
When arriving at an airport and following descent into the downwind leg, the aircraft is typically flown close to cruise speeds (a C172 at least). Towards the end of the downwind leg, it would be a good idea to start slowing down for numerous reasons such as ensuring the speed falls to within Vfe, not stretching the downwind too far and importantly, allowing a slow descent airspeed for the upcoming base leg. Once descending on the base leg, and holding a moderate airspeed well within Vfe, it’s a good idea to begin setting the aircraft up for landing and ensuring that it will be configured for that desirable ‘high lift’ capability. Once established on the final approach leg, too many students focus on a constant approach angle, but often allow an increase in airspeed. Here, the extra lift is desirable as the aircraft slows down, but the extra drag us equally advantageous, since it allows the airspeed to drop and stay low.
All this being said, flap use is intended to be circumstance based, rather that set at a specific point in the circuit. The trick is to learn how to manage your aircrafts energy efficiently. Just as you wouldn’t cruise with flaps down, it might not be a great idea to ‘drag’ it through the downwind leg. Delay adding flaps on base or final however and you’ll soon find yourself high and fast.
Thanks for the comment Atanas. Atanas is my flight instructor.
I’m not a pilot but do enjoy these postings. Always bn interested in flying and wish I could have learn to fly but have little vision in one eye.
Thanks Carl. Though you probably can’t get a license, you could still fly with an instructor. You should go up! There is a guy at our school who lost one of his arms, and is learning to fly. It is very inspiring.
Over 800 landings at Springbank and most were on 34 in the pic above.
I don’t even know why they need 16…
When crossing the powerline be at 500 feet, can’t go wrong.
I thought it was the wind as well then figured a way to land right so the wind blew me over to the centerline.
Right rudder is easier.
This message is from Sandra Vasques:
“Hi! I just read your post about landing and it really helped me a lot and made me feel more comfortable. I started my flight lessons early this years and I have almost 20 hours and I haven’t done my solo, so it is really discouraging. There are many reason why and one of them is I had to change instructors and I basically had to get adapted to the new instructor\’s way. Also because of the weather I haven’t been able to do my flights so often so there is a big gap between my lessons. I am having a hard time Landing and I think I am just over thinking about how to do it. My instructor is teaching me “pitch for airspeed and power for altitude” and even though it makes sense and I know many instructors teach it that way I just see it the opposite way. Pitch for altitude, and power for speed. Of course if you put the nose up the airspeed is going to decrease so you have to add power and that’s how I think about it. So my instructor keeps asking me so I tell home the way he is teaching me but then I get all confused…. Thank you again for your advices!! :)”